If you’re reading this, you’re probably aware that there’s some changes coming to Docker Desktop. Notably, it’s not going to be free to use for companies that make over $10M or have over 250 employees. This isn’t a nail in the coffin for docker on your desktop, however. Most docker users on windows usually are running from the command line anyway. So how do you get there?
Step 1: Remove Docker Desktop
This makes sense as a first step but beware! You will be losing all your images and containers in this step. You should have either memorialized them with Dockerfiles, or docker-compose files. This is docker, they should be ephemeral. It’s going to be a bandwidth drain to get them back, but this shouldn’t be a show stopper. Note: Depending on the size of the images, it’s gonna take a while to remove Docker Desktop.
Step 2: Grab the Docker Daemon
I downloaded this from here: https://download.docker.com/win/static/stable/x86_64/ and unzipped it into a folder. In my case, that’s d:\docker. Spoiler Alert, there’s not a lot here. dockerd.exe, and docker.exe are all she wrote.

Step 3: Run the Docker Daemon as a Service
Edit: You can skip this step! If you run dockerd with the ‘–register-service’ argument, you should be good! Thanks Per!
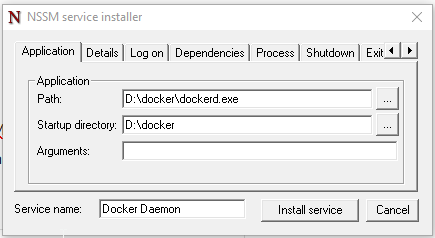
I get to use my favorite tool again, which is the Non-Sucking Service Manager (NSSM). Love the name, love the simplicity. You should be using Chocolatey by this point in your career. If not, go grab it here. To install NSSM, run this:
cinst nssmYou’ll see a bit o’ text fly by and just like that, you’ve got NSSM. Once that’s done, just run the following from inside your docker folder
nssm installYou’ll be greeted with the lovely nssm dialog where you can configure you’re service. Here, you’ll select “dockerd.exe” as the Path. It should also set the Startup Directory for you It looks like this.
Going into your Services, you should see it in the list. Make sure it’s started.
Step 4: Add the Docker folder to your path
This one doesn’t require a lot of explanation. Go into your System Settings and add the folder (in my case, d:\docker) to your path.
Step 5: Install Docker compose
This is another chocolatey installer. The bonus here is that it will be added to your PATH variable and is then available everywhere.
cinst docker-composeStep 6: Go
That’s it. You should be able to go back into your Sitecore folders and run the same commands you’re used to. If you run into any issues, feel free to drop a comment here or pop into slack in the #docker channel.

Closing Note: This isn’t going to work for you if you’re using Linux containers. That process is a bit more complex than this blog post. Stay tuned for more on that front at a later date
Wait a minute – it’s just Docker Desktop that’s paid? Not the daemon? I don’t even _like_ using Desktop – would much prefer CLI anyway. This is easier than I thought 🙂
Yep, just the Docker Desktop is paid… daemon is free!