[ls_content_block id=”385″]
I started this an embarassingly long time ago, in a galaxy far away. Actually it was an alcohol-infused one-man hackathon where I secured first place. Anywho, here goes nothing (If you want to skip right to getting started, scroll to “Getting Started”)
Why a new SIF-less?
The first one was ok, in my eyes. I realize it filled a gap to get Sitecore 9 installed. That’s nice. But it was a few things:
- Ugly as hell.
- A little clunky to run the actual scripts from. Actually triggered a few virus protection suites, from what I heard. Not beuno.
- Tedious to keep track of various settings and versions.
- Only supported the XP Topology. Yuck.
- Did I mention ugly?
What’s new?
In a word: profiles. One of the big things I wanted to accomplish with SIF-less 2 was the concept of profiles. Profiles come in three flavors. Sitecore, Solr and SQL. It’s pretty self explainatory what each is for, so let’s look at the types of profiles:
The Sitecore Profile
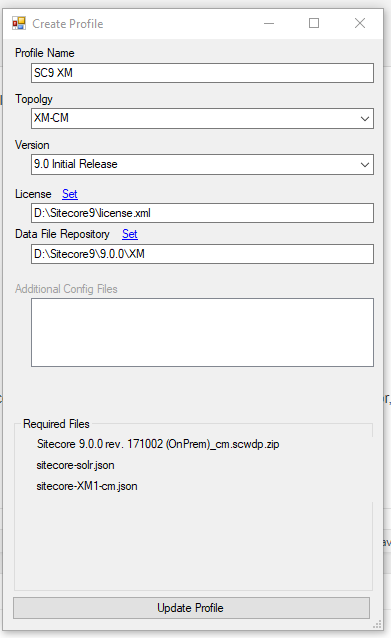
The Sitecore profile is pretty straight forward. It contains your basic Sitecore settings including the topology, version, and the file location.
Validation includes:
- Checking for each file required by the installation. This list is specified in the ConfigurationManifest.xml, which is a whole ‘nother topic in another post. Suffice to say, each file required for the install is checked to ensure it exists.
(A quick note about File Location: At some point, I’ll throw together something slick like SIM where you can download all the versions you want. For now, you have to point at a folder where the zip was unzipped to. This is Beta, after all…)
The Solr Profile

The Solr profile is a little more complex than the Sitecore profile. The main points to note here are the URL, Service (which now selects a service from a list, so you don’t have to memorize if you put a period or a hyphen in 6.6.2), and Core path.
Validations include:
- Folder is Valid Core Folder – Does the folder exist, and does it contain a “\server\solr\solr.xml” file.
- Service is Running – Check whether or not the service is running. Kinda important for the next two.
- URL works – Does the url start with “https” and end with “/solr”. Also, does the URL allow for an API call to “/admin/info/system” and get a 200 back.
- Solr is correct version – Does the URL with the API endpoint “/admin/info/system” contain valid XML and a valid solr-spec-vesion attribute that’s higher than 6.6.2.
The SQL Profile

The SQL Profile is actually quite straight forward as well. Nothing fancy.
Validation here is for:
- The ability to actually connect to the server
- Whether or not SQL is running 2016 or higher
- If the specified user can create a database.
Put all these together, and you get a main UI that looks something like this:

Getting Started
With all that, what do you need to do?
- Go download SIF-less 2. You can snag it on Github here: https://github.com/RAhnemann/sif-less
- If you want the zip, grab it here.
- Open the App. You’ll notice three sets of Profile data. One Sitecore, one Solr, one SQL.
- Add a Sitecore Profile:
- Click Manage (Next to “Sitecore Profile”)
- Click “Add Profile”
- Fill out the data. Topology and Version are statically coded right now. Select your license file and the folder where the scwdp and config files are
- Save it
- Close the Manage dialog
- Add a Solr Profile
- Click Manage (Next to “Solr Profile”)
- Click “Add Profile”
- Fill out the data. Your solr folder should be the folder that contains “server”. SIF-less will check it for you, have no fear.
- Save it
- Close the Manager Dialog
- Add a SQL Profile
- You should have the hang of this by now….
- Select a Profile for Sitecore, Solr and SQL. You’ll notice an additional field or two pop up on the right side. These are dynamic based off your topology and version combination. Fill this in, as well as the instance name.
- Hit Generate. SIF-less will prompt you for location to save the file.
- Save it.
- Open up Powershell (in admin!) and run the EZ file. Fun note: You can uninstall it with the same file and a “-uninstall” flag to go with it.
- You’re done. 10 steps. (Next time you do this, it’ll be 2 steps. Because Texas.
If you have any questions or issues, feel free to DM me on Twitter @RAhnemann or on slack @rob.ahnemann
Note: I’ll be working on some good ol’ information on some of the extensibility features of SIF-less 2 in a later post, hopefully this week. Stay tuned. 🙂
What’s Next?
I’ve got a few more things I want to do with SIF-less 2, which include the following, in no particular order:
- Fixing the stupid PSHost issue where SIF tries to snag the Host Width and dies on the vine. I’m feeling a custom PSHost in here.
- Adding back in the SIF and SIF Fundamentals validators
- Expand out a better token-replacement system for the configs
- A UI that doesn’t look like ass.
- Expand the configs to work with Sitecore 9 Commerce
- More flexible field types (SQL Connection, Folder, etc)
- More validators!
- Put some validators in the ps1 generated, and allow for a “Skip Validation” flag
- Create a PS Module with all the Uninstall scripts in there…
[…] about half a year ago Rob came up with an updated version of SIF-Less tool, called 2.0. Being very busy on a project, not having the need to actually start using the new version & […]