In a previous post, I talked about how to create custom hidden fields in WFFM. While this is a great way to get custom data to your Save Action, it really doesn’t allow for much more flexibility from a Content Editor point of view. In this post, I’d like to show how to pass custom parameters to your Save Actions but using a user-friendly view instead. I’ll be breaking this post up into a handful of steps.
- WFFM Designer Control
- The View Model
- Sitecore Constructs
WFFM Designer Control
When we talked last about WFFM, we were simply adding the ability to pass custom data through WFFM into our Save Actions. This time around, we want the Content Editor to have some (controlled) input into this process. For this, we’ll need a UI element for them to act with. This is technically a control. We’ll defined it as follows:
namespace Client.Framework.Forms.Controls
{
    [Designer("System.Windows.Forms.Design.ParentControlDesigner, System.Design", typeof(IDesigner))]
    public class LeadType : BaseControl
    {
        public string Title { get; set; }
        private string _LeadType;

        [VisualProperty("Lead Type")]
        [VisualCategory("Custom Settings")]
        [VisualFieldType(typeof (LeadTypeField))]
        public string LeadTypeValue { get; set; }

        public override ControlResult Result { get; set; }

    }
}
This tells WFFM how to render the input field. Some are text, some are drop downs. With the settings above, you’ll see the following output:
That’s good. We have a field called “Lead Type” in a section called “Custom Settings.” But how do we know it’s a drop down, a text box, a radio or a check? The highlighted field is where we’re going to delve into next. This field actually is another type we’ll have to define. It essentially tells WFFM how to render the contents of that Control you just created.
namespace Client.Framework.Forms.Visual
{
    public class LeadTypeField : WebControl, IVisualFieldType
    {
        private readonly Settings _settings;

        public string DefaultValue { get; set; }
        public string EmptyValue { get; set; }
        public bool IsCacheable { get; private set; }
        public bool Localize { get; set; }
        public ValidationType Validation { get; set; }

        public LeadTypeField()
            : this(Settings.Instance())
        { }

        public LeadTypeField(Settings settings)
            : base(HtmlTextWriterTag.Select.ToString())
        {
            Assert.IsNotNull(settings, "settings");
            _settings = settings;
        }

        public string Render()
        {
            OnPreRender(this, null);

            var writer = new HtmlTextWriter(new StringWriter());

            RenderControl(writer);

            return writer.InnerWriter.ToString();
        }

        protected virtual void OnPreRender(object sender, EventArgs ev)
        {
            Controls.Clear();

            base.OnPreRender(ev);

            Controls.Add(new Literal
            {
                Text = "<option {0} value='{1}'>{1}</option>".FormatWith(DefaultValue == EmptyValue ? "selected='selected'" : string.Empty, EmptyValue)
            });

            foreach (Item obj in _settings.ItemRepository.GetItem(_settings.LeadTypesRootId).Children)
            {
                Controls.Add(new Literal
                {
                    Text =
                        "<option {0} value='{1}'>{2}</option>".FormatWith(
                            DefaultValue == obj.Fields[_settings.ValueFieldName].Value ? "selected='selected'" : string.Empty,
                            obj.Fields[_settings.ValueFieldName].Value,
                            obj.DisplayName)
                });
            }

            Attributes["onblur"] = string.Format("Sitecore.PropertiesBuilder.onSaveValue('{0}', '{1}', {2})", (StaticSettings.PrefixId + (Localize ? StaticSettings.PrefixLocalizeId : string.Empty)), ID, Localize ? 1 : 0);
            Attributes["onchange"] = Attributes["onblur"];
            Attributes["onkeyup"] = Attributes["onblur"];
            Attributes["onpaste"] = Attributes["onblur"];
            Attributes["oncut"] = Attributes["onblur"];
        }

    }
}
So that’s a lot of code to get through. Let’s pick it apart piece by piece:
The Constructors
public LeadTypeField()
	: this(Settings.Instance())
{ }

public LeadTypeField(Settings settings)
	: base(HtmlTextWriterTag.Select.ToString())
{
	Assert.IsNotNull(settings, "settings");
	_settings = settings;
}
These constructors are relatively simple. Note the fact we’re passing in a Settings object. This is a custom configuration we’re going to use for the population of the drop down. You can populate this any way that you want, but I’m going to leverage Sitecore’s Config Factory to create one for me and use it as a singleton. Also, take note of the “HtmlTextWriterTag.Select” parameter passed in. This tells the Field that it’s going to use a “<select>” to wrap everything up.
Here’s the Settings class:
namespace Client.Framework.Forms
{

    public class Settings
    {
        public IItemRepository ItemRepository { get; set; }
        public string LeadTypesRootId { get; set; }
        public string ValueFieldName { get; set; }

        public Settings(string leadTypesRootId, string valueFieldName, IItemRepository itemRepository)
        {
            LeadTypesRootId = leadTypesRootId;
            ValueFieldName = valueFieldName;
            ItemRepository = itemRepository;
        }
        private static Settings _settings;

        public static Settings Instance()
        {
            return _settings ?? (_settings = Factory.CreateObject("wffm/leadTypeSettings", false) as Settings);
        }
    }
}
Emphasis on the Factory line here. This path actually points to a patch we’ve entered into a config file. We’re going to try to stick to the standards that WFFM uses as much as possible for consistency and readability. Here’s the config file:
<configuration xmlns:patch="http://www.sitecore.net/xmlconfig/">
  <sitecore>
    <wffm>
      <leadTypeSettings type="Client.Framework.Forms.Settings, Client.Framework">
        <param name="leadTypesRootId">{67187095-2671-4491-B039-F8D795AB624A}</param>
        <param name="valueFieldName">Value</param>
        <param name="itemRepository" ref="/sitecore/wffm/itemRepository"/>
      </leadTypeSettings>
    </wffm>
  </sitecore>
</configuration>
I’ve highlighted a line to point out that you can actually reference other settings nodes in WFFM. We don’t need to redefine the Item Repository again, since WFFM does that already for us. This will cut down on configuration errors during deployment and it just feels good. Notice the param names correspond to names of the parameters in my Settings constructor. Sitecore’s config Factory will wire this up for us automagically.
Now that we’ve constructed our Field Type, we can Render it
Rendering
public string Render()
{
	OnPreRender(this, null);

	var writer = new HtmlTextWriter(new StringWriter());

	RenderControl(writer);

	return writer.InnerWriter.ToString();
}
This is relatively simple, in that it just calls PreRender and then renders the control.
Controls.Clear();

base.OnPreRender(ev);

Controls.Add(new Literal
{
	Text = "<option {0} value='{1}'>{1}</option>".FormatWith(DefaultValue == EmptyValue ? "selected='selected'" : string.Empty, EmptyValue)
});

foreach (Item obj in _settings.ItemRepository.GetItem(_settings.LeadTypesRootId).Children)
{
	Controls.Add(new Literal
	{
		Text =
			"<option {0} value='{1}'>{2}</option>".FormatWith(
				DefaultValue == obj.Fields[_settings.ValueFieldName].Value ? "selected='selected'" : string.Empty,
				obj.Fields[_settings.ValueFieldName].Value,
				obj.DisplayName)
	});
}
This little gem of code uses our Settings (highlighted) to retrieve data from the Item Repository and render a list of options. It also includes a Default Value and will try to select any value that has already been set.
Attributes["onblur"] = string.Format("Sitecore.PropertiesBuilder.onSaveValue('{0}', '{1}', {2})", (StaticSettings.PrefixId + (Localize ? StaticSettings.PrefixLocalizeId : string.Empty)), ID, Localize ? 1 : 0);
Attributes["onchange"] = Attributes["onblur"];
Attributes["onkeyup"] = Attributes["onblur"];
Attributes["onpaste"] = Attributes["onblur"];
Attributes["oncut"] = Attributes["onblur"];
The sole purpose of these five lines are to ensure that when you set the value in the Form Designer, it gets saved. Without these, there is no persistence of data in the designer. Don’t forget them!
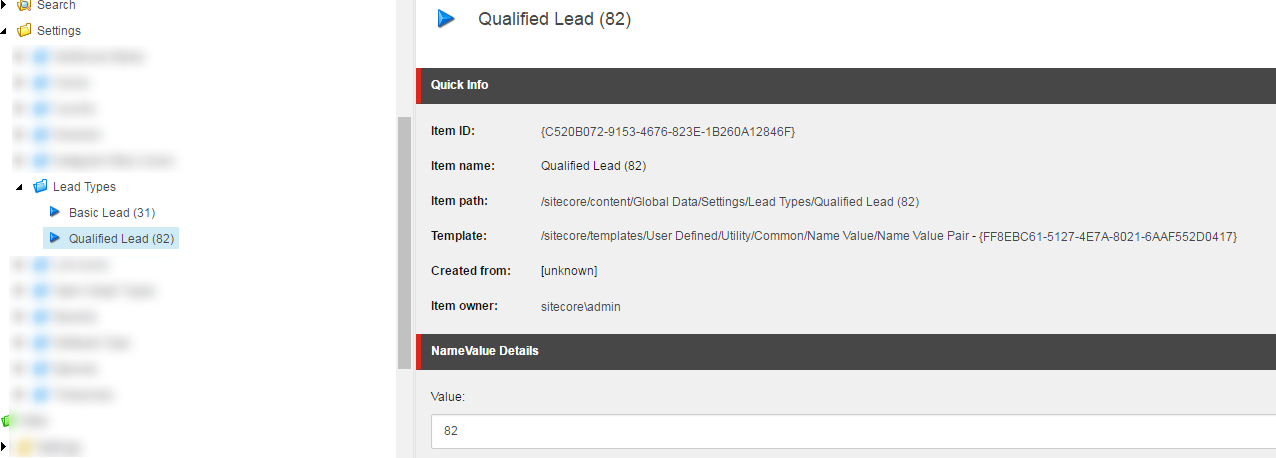
This is all the code we need actually render the field in Designer. What’s left from there is the source of the drop down. Our project uses a simple Name Value Item which is exactly what it sounds like. The Name of the Item and a Value field. Here’s a shot of that source:
The View Model
Our View Model for the Lead Type is actually going to be relatively simple. We can use most of what we had previously for the Hidden Fields. The one change is that we’re not going to be calculating the value, we’re going to pull it from the parameters.
namespace Client.Framework.Forms.ViewModels
{
    public class LeadTypeField : ValuedFieldViewModel<string>
    {
        public override void Initialize()
        {
            this.ShowTitle = false;
            this.Value = this.Parameters["leadtypevalue"];
        }
    }
}
We’re grabbing “leadtypevalue” from the parameters, as it matches the field defined in our Control. That’s it.
Now we can render it in our View, much like our other Hidden Field.
@using Sitecore.Forms.Mvc.Html
@model  Client.Framework.Forms.ViewModels.LeadTypeField

@using (Html.BeginField())
{

    @Html.Hidden("LeadTypeId", Model.Value);
}
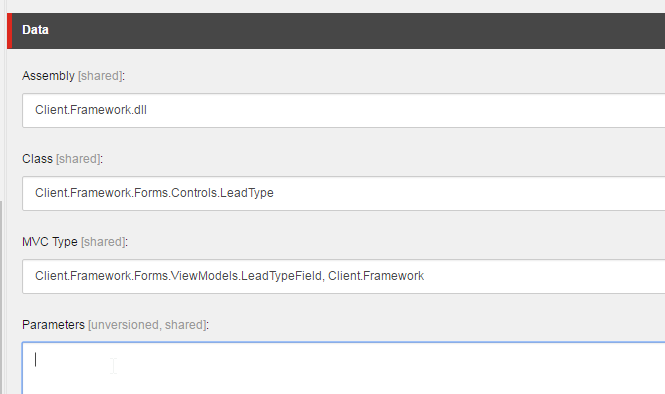
The Sitecore Field Item
You can see that we’ve referenced both the Control and the ViewModel here (last time we only used ViewModel as there was no Control involved).
That’s it. Let’s see it in action:
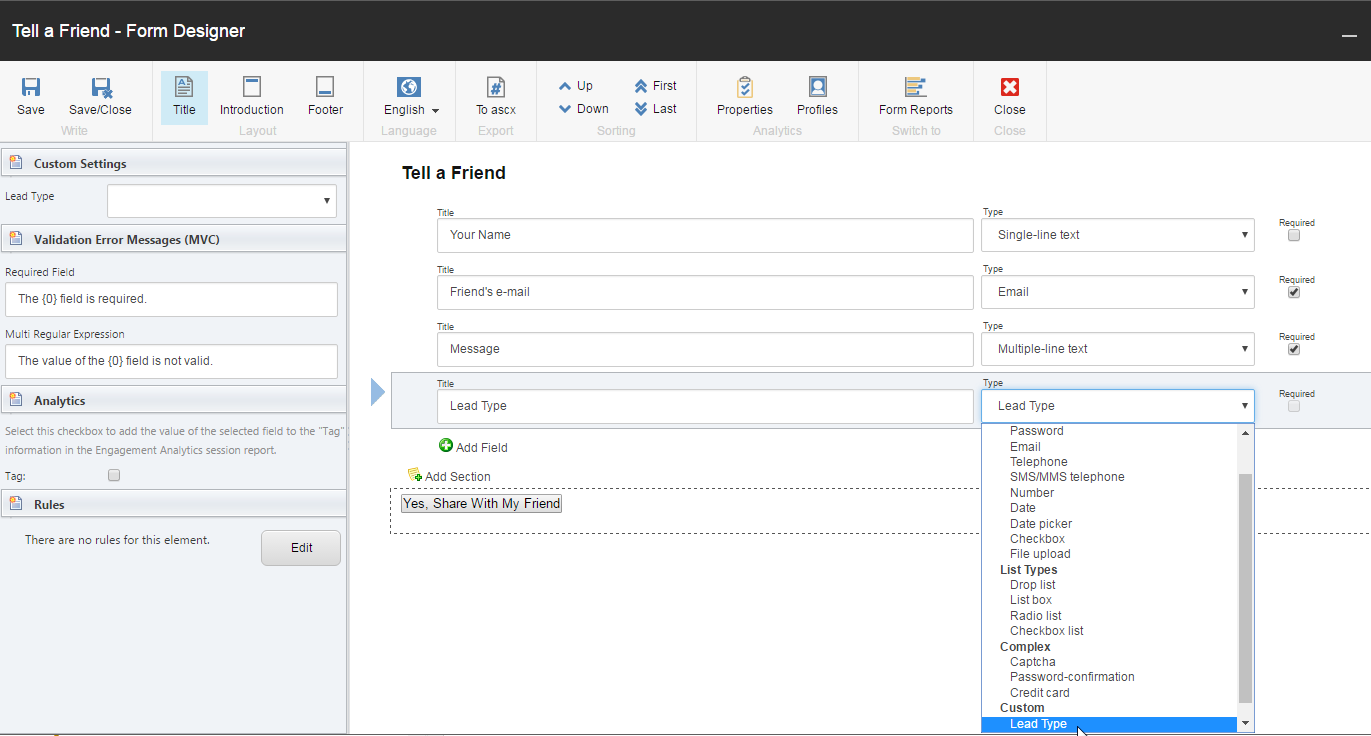
First, we’ll open up the Tell a Friend form and add the custom field:
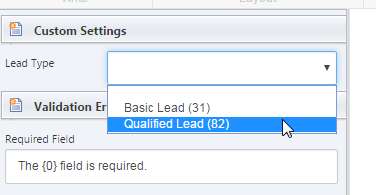
Now that we’ve created the Lead Type field, we can select the Lead Type that we want passed with the Form:
(I’ve given the Editor a little bit of insight into the values passing in by adding them to the Item Name)
Now that we’ve selected the Lead Type, we need to save and publish.
When we view the form and check the HTML out, we can see there are four fields in our HTML.
Expanding the last one (Lead Type), we can see the values specified by the Author in the WFFM Designer.
Does this actually pass into a Save Action? Heck yes it does!
Now our Content Editor can create a form of any type and specify custom parameters to any Save Action that is configured. If there are any questions please drop a comment.


Thanks for the awesome post. I am just wondering how can I extend the drop list field. Like I want to add an option to select drop list source from an external API. The out of the box options only allows drop list field source to be from sitecore itself. Any guidance will be highly appreciated.
Thanks in advance
Good question. You’d want to create a derived field type from the Drop List type. There’s the OnPreRender method where it populates the items from Sitecore, and you could do the same, but leverage that third party API. It should be pretty similar to what you see above here.